Testing in Go: Failing Tests
Table of Contents
A short overview of the testing package #
The testing package from Golang’s standard library provides support for
automated testing of Go packages. It is intended to be used in combination with
the go test command. In combination with go test, this package expects
certain naming conventions that we will cover in another article.
Still, for this article, we have to know that:
- Every test file ends with
*_test.go - Every test function has the format
TestXxx, whereXxxmust not start with a lowercase letter
The testing package exposes two different modes: testing and benchmarking.
While what we will be discussing here is transferable to benchmarking as well,
we will focus on how to fail our tests in a good way and how to provide
meaningful error messages.
Logging with Log and Logf #
If we look at the index of T type in the
testing package, there’s a list of functions that represent errors or failures:
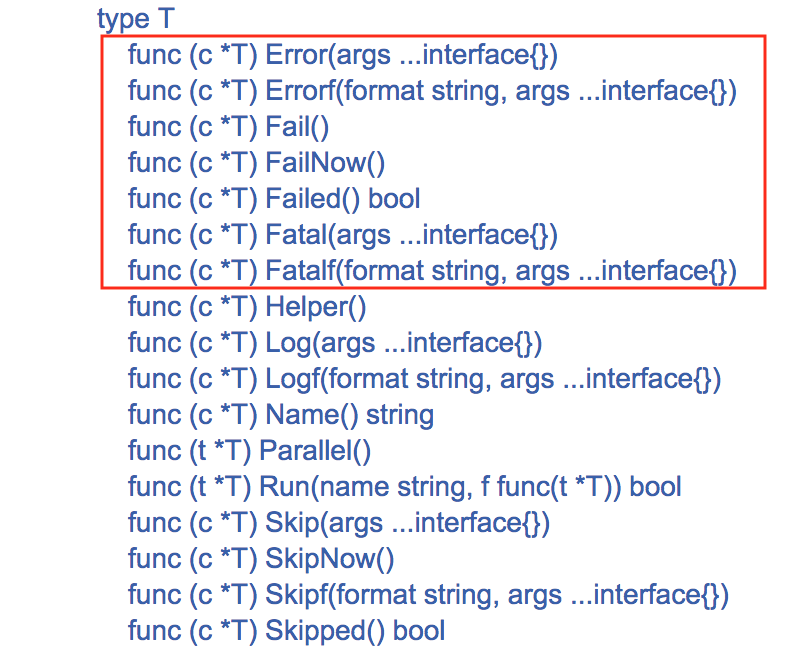
Quite some options, right? But before we dive into these different functions,
let’s look at another one: Logf (docs).
You might be thinking: “I came here to read about signaling test failures, and for some reason, you’re forcing me to read about logging”. Trust me, there’s a connection here.
Log formats its arguments using default formatting, analogous to Println,
while Logf takes one or more arguments: a format string and additional
arguments. It formats its arguments according to the format (analogous to
Printf). Both these functions save the text in the error log. Compared to
Println and Printf, the difference is that Log and Logf save the output
to the error log (instead of os.Stdout), and they also add a final newline.
When tests fail or when the -test.v flag is present, the text is printed out.
Basically, Log & Logf are the Println and Printf of the testing
package, but with a twist - they print only in verbose mode or when a test
fails. An example:
package main

import "testing"

func TestFoo(t *testing.T) {
	t.Logf("Testing Foo")
}
If we would run this using go test, there won’t be any output. But, if we run
it using the -test.v flag, we’ll see something like this:
$ go test -test.v
=== RUN   TestFoo
--- PASS: TestFoo (0.00s)
    foo_test.go:6: Testing Foo
PASS
ok  	github.com/fteem/testing_in_go	0.006s
As you can see above, the test returns PASS because there was no test that
got marked as failed. If we would like to mark a test as failed, we would have
to invoke t.Fail() inside the test. Let’s do that:
package main

import "testing"

func TestMax(t *testing.T) {
	t.Logf("Testing Foo")
	t.Fail()
}
Now, when we run go test, we should see the test marked as a failure:
$ go test
--- FAIL: TestMax (0.00s)
    max_test.go:6: Testing Foo
FAIL
exit status 1
FAIL	github.com/fteem/testing_in_go	0.006s
What’s great about this type of logging is that although the test is marked as
a failure on line 7, the t.Logf call is on line 6, and the output clearly
shows that. If we added any other logging below, we would see a separate line
for each of the t.Logf calls:
package main

import "testing"

func TestMax(t *testing.T) {
	t.Logf("Testing Foo")
	t.Fail()
	t.Logf("Another log from Foo")
}
And the output of the go test invocation:
$ go test
--- FAIL: TestMax (0.00s)
    max_test.go:6: Testing Foo
    max_test.go:8: Another log from Foo
FAIL
exit status 1
FAIL	github.com/fteem/testing_in_go	0.006s
This behavior is due to the way t.Logf functions. With every invocation, it
adds the log lines to the error log. Still, it dumps the whole log to STDOUT
only when the tests fail by running all of them and seeing if any were marked
as failed. That’s why in the above example, we see that the failure is marked
on line 7, yet all the logs are present (from line 6 and line 8).
So why are Log and Logf` important? Because all of the following functions
that we will explore rely on them to write their outputs to the error log. And
log output is essential to showing the failures of the failing tests.
Signaling test Failure #
To illustrate the different types of failing a test in Golang, we will first
need to write a small function that we can test. Let’s use a simple function
Max that takes a slice of `int’s and returns the largest integer of them all:
// max.go
package main

func Max(numbers []int) int {
	var max int

	for _, number := range numbers {
		if number > max {
			max = number
		}
	}

	return max
}
Let’s write a small test function:
package main

import "testing"

func TestMax(t *testing.T) {
	input := []int{1, 2, 3, 4, 5}
	actual := Max(input)
	expected := 6

	if actual != expected {
		t.Logf("Expected %d, got %d", expected, actual)
	}
}
The TestMax function defines an input slice of int’s, the result of the
invocation of Max with the input as argument (called actual) and the
expected value of the invocation.
Suppose the expected value does not match the actual result. In that case,
we want to tell the person (or program) running this test that we received
something that we weren’t expecting. We do this by invoking t.Logf by
providing a nice explanation for the human.
The expected value here is wrong. It expects 6 while the maximum element of
the input slice is 5. That means that this test should fail when we run it:
$ go test
PASS
ok  	github.com/fteem/testing_in_go	0.006s
Huh? Here’s the first thing we have to understand about signaling failures in
tests: we have to tell the testing package that this is a failed test. And we
are the ones to define what failure means. Usually, it’s actual != expected,
but other times it can be something else. What testing only cares about is
recording if there was a test failure or not. There are multiple ways to do
this, t.Fail being the easiest one.
Let’s add a call to t.Fail after the t.Logf call:
package main

import "testing"

func TestMax(t *testing.T) {
	input := []int{1, 2, 3, 4, 5}
	actual := Max(input)
	expected := 6

	if actual != expected {
		t.Fail()
		t.Logf("Expected %d, got %d", expected, actual)
	}
}
Let’s run it:
$ go test -v
--- FAIL: TestMax (0.00s)
    max_test.go:11: Expected 6, got 5
FAIL
exit status 1
FAIL	github.com/fteem/testing_in_go	0.006s
Boom! Our test failed, as expected. You can notice that the log is now visible,
including our call to Logf with our informative error message Expected 6, got 5.
Now that we have our first test failure signaled let’s look at different ways we can signal test failures.
Delayed vs. immediate failure #
Golang’s testing package promotes two types of failures. The first failure
type immediately stops the tests from running. And the second failure type
registers the failure but reports it only after all tests finish running. These
functions are aptly named Fail and FailNow to reflect the two different
behaviors.
Let’s explore their behaviour and usage by continuing testing the Max
function we already built.
We could write one other test case checking that the slice passed as an
argument is not empty. If it is, we will return -1. Otherwise, we will return
the maximum item we find. Let’s write the new test first:
package main

import "testing"

func TestMax(t *testing.T) {
	input := []int{1, 2, 3, 4, 5}
	actual := Max(input)
	expected := 5

	if actual != expected {
		t.Fail()
		t.Logf("Expected %d, got %d", expected, actual)
	}
}

func TestMaxEmptySlice(t *testing.T) {
	input := []int{}
	actual := Max(input)
	expected := -1

	if actual != expected {
		t.Fail()
		t.Logf("Expected %d, got %d", expected, actual)
	}
}
If we run it, without adding any new functionality to the Max function, it
will fail:
$ go test
--- FAIL: TestMaxEmptySlice (0.00s)
    max_test.go:22: Expected -1, got 0
FAIL
exit status 1
FAIL	_/users/Ilija/Documents/testing	0.005s
We can see here that the TestMax function is run and passes, while the
TestMaxEmptySlice fails. We achieve that by marking the test as failed using
t.Fail(). Let’s add the new functionality to Max, which would make the test
pass:
func Max(numbers []int) int {
	if len(numbers) == 0 {
		return -1
	}

	var max int

	for _, number := range numbers {
		if number > max {
			max = number
		}
	}

	return max
}
While the change does not make much sense, for our purpose, it will do the trick. Let’s run the test:
$ go test
PASS
ok  	_/Users/Ilija/Documents/testing	0.004s
Now, let’s look into the two things that the Max function does. We could
theoretically attach an importance level to both of them. For example, the
guard clause which returns -1 when the slice argument is empty has lower
importance than the actual algorithm that detects the maximum element of the
slice. If someone is expanding that algorithm and it goes south, we want to be
very loud and “stop the world”. That’s because none of the other
functionalities of the function are more relevant than that one.
In cases like these, we can use the FailNow() function to mark the failed
test and immediately stop any further execution of the particular test that
tests the max detection. Let’s use it in our tests:
package main

import "testing"

func TestMax(t *testing.T) {
	input := []int{1, 2, 3, 4, 5}
	actual := Max(input)
	expected := 5

	if actual != expected {
		t.Logf("Expected %d, got %d", expected, actual)
		t.FailNow()
	}
}

func TestMaxEmptySlice(t *testing.T) {
	input := []int{}
	actual := Max(input)
	expected := -1

	if actual != expected {
		t.Logf("Expected %d, got %d", expected, actual)
		t.Fail()
	}
}
Also, we need to make the Max function misbehave. To short-circuit this
quickly, let’s make the Max function return -100 so we can see the
difference.
If we run this now, there would not be a difference in how the tests will run,
although we use FailNow:
$ go test -v
=== RUN   TestMax
--- FAIL: TestMax (0.00s)
    max_test.go:11: Expected 5, got -100
=== RUN   TestMaxEmptSlice
--- FAIL: TestMaxEmptySlice (0.00s)
    max_test.go:22: Expected -1, got -100
FAIL
exit status 1
FAIL	_/Users/Ilija/Documents/testing	0.005s
That is because the TestMax function only does one assertion. Let’s rework
our tests a bit to use table-driven tests:
type TestCase struct {
	input    []int
	expected int
}

func TestMax(t *testing.T) {
	cases := []TestCase{
		TestCase{
			input:    []int{1, 2, 3, 4, 5},
			expected: 5,
		},
		TestCase{
			input:    []int{-1, -2, -3, -4, -5},
			expected: -1,
		},
		TestCase{
			input:    []int{0},
			expected: 0,
		},
	}

	for _, c := range cases {
		actual := Max(c.input)
		expected := c.expected

		if actual != expected {
			t.Logf("Expected %d, got %d", expected, actual)
			t.Fail()
		}
	}
}
What the table-driven tests do is they loop over multiple test cases (often
structs with the expected input and output), and they set assertions on them.
If we would run the tests now, with using t.Fail() instead of t.FailNow()
we should see the following output:
$ go test
--- FAIL: TestMax (0.00s)
    max_test.go:31: Expected 5, got -100
    max_test.go:31: Expected -1, got -100
    max_test.go:31: Expected 0, got -100
--- FAIL: TestMaxEmptySlice (0.00s)
    max_test.go:43: Expected -1, got -100
FAIL
exit status 1
FAIL	_/Users/Ilija/Documents/testing	0.005s
We actually get all failing cases for both tests. Let’s replace the t.Fail()
invocation to t.FailNow() in the TestMax function and run the test:
$ go test -v
=== RUN   TestMax
--- FAIL: TestMax (0.00s)
    max_test.go:31: Expected 5, got -100
=== RUN   TestMaxEmptSlice
--- FAIL: TestMaxEmptySlice (0.00s)
    max_test.go:43: Expected -1, got -100
FAIL
exit status 1
FAIL	_/Users/Ilija/Documents/testing	0.004s
You can see that instead of running each of the test cases and marking them as failures, the test function stopped right after hitting the first failing case.
Reporting the failure is the critical difference between the two, t.Fail()
and t.FailNow(). Using the latter, we can stop the tests and communicate with
the developer that something is wrong quickly. In comparison, imagine if we had
to wait for all test cases to complete before we have some sort of output. The
long feedback loop would slow down development speed and waste time running all
tests.
Having a clear difference and use cases for Fail and FailNow in mind, let’s
look into how we can combine failure reporting (Log and Logf) with failure
marking (Fail and FailNow) in a more structured approach.
Signal & report failures in one go #
Understanding the basics and variations of logging and signaling errors is crucial to understand what we will talk about now. If you look at all the tests we wrote so far, although we switched up the approaches by using table-driven tests, two steps were constant:
- In all tests, we had to check for a mismatch between the expected and the actual values, and
- We had to call report (
Log) and signal failure (Fail) if there was a mismatch
Luckily, the testing package makes our life a bit easier by implementing
functions that combine both the logging and the test failure. And because there
are two ways to signal test failures, there are two functions to do
this:Error and Fatal, with their variants.
Let’s reuse the tests that we wrote above, namely the TestMax and
TestMaxEmptySlice functions. If we would like to quickly collapse the
invocation of t.FailNow() and t.Log() we can simply use t.Fatal(). We use
t.Logf() instead of t.Log() in our test functions but conveniently for us,
the testing package also implements a t.Fatalf() function, which is a
combination of t.FailNow() + t.Logf().
Let’s see how we can use it in our TestMax test function:
func TestMax(t *testing.T) {
	cases := []TestCase{
		TestCase{
			input:    []int{1, 2, 3, 4, 5},
			expected: 5,
		},
		TestCase{
			input:    []int{-1, -2, -3, -4, -5},
			expected: -1,
		},
		TestCase{
			input:    []int{0},
			expected: 0,
		},
	}

	for _, c := range cases {
		actual := Max(c.input)
		expected := c.expected

		if actual != expected {
			t.Fatalf("Expected %d, got %d", expected, actual)
		}
	}
}
The change is small. We keep the log format and content. Still, instead of
passing it to t.Logf(), we pass it to t.Fatalf() as an argument, while
t.FailNow() can be removed entirely. If we rerun our specs we will not see
any difference in the behavior or the output in comparison to the previous
implementation:
$ go test
--- FAIL: TestMax (0.00s)
    max_test.go:31: Expected 5, got -100
--- FAIL: TestMaxEmptySlice (0.00s)
    max_test.go:42: Expected -1, got -100
FAIL
exit status 1
FAIL	_/users/Ilija/Documents/testing	0.005s
The style of invocation of t.Fatalf() we see here also applies to t.Error()
and t.Errorf(). We can make a small change to our TestMaxEmptySlice
function and use t.Errorf() instead of a combination of t.Logf() and
t.Fail():
func TestMaxEmptySlice t *testing.T) {
	input := []int{}
	actual := Max(input)
	expected := -1

	if actual != expected {
		t.Errorf("Expected %d, got %d", expected, actual)
	}
}
The usage of t.Errorf() is the same as t.Fatalf() in the
previous example. As expected, the output and the behavior of the test
function also will not change:
$ go test
--- FAIL: TestMax (0.00s)
    max_test.go:31: Expected 5, got -100
--- FAIL: TestMaxEmptySlice (0.00s)
    max_test.go:42: Expected -1, got -100
FAIL
exit status 1
FAIL	_/users/Ilija/Documents/testing	0.005s
When to use Error(f) or Fatal(f) #
So, we took a look at all the variations of signaling test failures and logging
such failures and the behavior of the respective functions. For those wondering
when we should use Error or Fatal, I think that’s an essential question
that we should explore and come up with a good answer.
Now, there’s no hard and fast answer here. In cases like these, we need to look at guidelines on when to use these functions. If we look at the composition of these two functions, it will look something like this:
* Error()  = Fail()    + Log()
* Errorf() = Fail()    + Logf()
* Fatal()  = FailNow() + Log()
* Fatalf() = FailNow() + Logf()
By looking at the composition of these functions, getting a clearer indication of the intended usage is easier:
If marking the test function as failed, but continuing its execution can/will
provide the user (the programmer) with more information that can aid them in
fixing the failure – it’s better to use Error(f) instead of Fatal(f). If
unsure, start with Error(f) and work your way towards a definitive approach.
There are multiple examples of this scenario. For instance, if your test
function executes queries against a test database, not failing on the error
from the first query might give you more debugging information.
Suppose a test function cannot recover from a failure, and its execution
doesn’t make sense. In that case, it’s better to use Fatal(f) and stop the
further execution. Such cases are errors while loading fixtures or filesystem
permission errors.
These are two guidelines you can use to choose what functions to use. Of course, there are exceptions to this, so it’s up to us to use good judgment when writing our test functions.
In closing #
In this article, we explored a lot of the details around failing tests. We went
deep in to understand how failure logging is done using Go’s testing package
- although it was unclear at that moment how it is related to failing tests.
Then we went on to explore signaling test failures and the different approaches
we can take when marking our tests as failed.
We looked in-depth about the difference between Fail and FailNow, and how
to apply them better in our tests. In the end, we looked at some neat functions
that the testing package has that make our lives a bit simpler. We discussed
two different strategies of using the Error and the Fatal functions in our
tests.
If you would like to learn more about marking tests as failed in Go, you can
check the documentation of the testing
package.