Tell your team you are running late using Google Home, Google Cloud Functions, Golang and Twilio
Table of Contents
In this age of cloud platforms, Internet of Things and SaaS products that are easy to integrate with, the effort of automating parts of your life is shrinking down substantially with every year that goes by. Additionally, these services have very generous free plans (or are quite affordable), you won’t have to pay a fortune for this automation. In this article I’ll show you how you can create your own commands for your Google Home. We will use Golang to glue together Google Cloud Functions, Google Actions, Google Dialogflow and Twilio.

I am not an early bird #
Waking up is hard for me. I prefer to stick around hacking (or watching useless videos on YouTube) in the evening until past midnight, so waking up at 8AM is… challenging. On the flip side, my team has a standup/daily SCRUM every morning at 10 o’clock. Being the “early bird” that I am, this usually means that I barely make the standup, or I end up being 10 minutes late. Missing the standups often completely misses the point of the standup. But that’s for another discussion.
Now, since that has been going on lately quite a bit, I decided that I need to automate my life a little bit. I wanted to SMS my team lead every time I am running late, by telling my Google Home that I am late for work. This would effectively tell my team to delay the standup for a bit, so I don’t miss the standup.
Genius? I know, right!?
I decided to glue together multiple platforms and services to achieve this. Sending SMSes - Twilio Messaging API. Running the code in the cloud - Google Cloud Function. Integrating with Google Home - Google Dialog Flow. The glue - Golang.
Before we begin… #
Before we begin with the cool things and start building, I want to get something out of the way. This article makes some assumptions when it comes to platform and services availability. This means that if you want to follow along, you need the following things:
- You need a functioning Google Cloud Platform account. This is not free, but Google gives some free credit ($300 I believe) for the first year. Also, I recommend creating a new project on Google Cloud Platform. This will allow you to have an easier time managing the resources used by this exercise.
- Install the Google Cloud SDK, also known as
the
gcloudcommand line tool. This is essential for easier management of your GCP projects and resources via the command line. - You need a Twilio account - at least for a proof of concept you can get some free SMSes. If you would like to take this further, you’ll be charged for it. You also need to make sure you have a verified phone number on Twilio. This phone number will be the source of the SMSes that you will be sending via their API.
- You need a Google Dialogflow account. We will use this to create the agent and action, which we’ll integrate with Google Assistant.
- (Optionally) You need a Google Home device, for an extra coolness effect. This will work with any Google Assistant-enabled device, including your laptop which can run a simulator in the browser.
Hooking up to Twilio’s Messaging API #
The great part about Twilio is that their blog has helpful resources on how to send SMSes using Golang. While you can read the step by step tutorial on their blog, I’ll cover most of the required steps here as well.
Be able to send an SMS we first need to find the Account SID and Auth Key in our Twilio account’s dashboard:
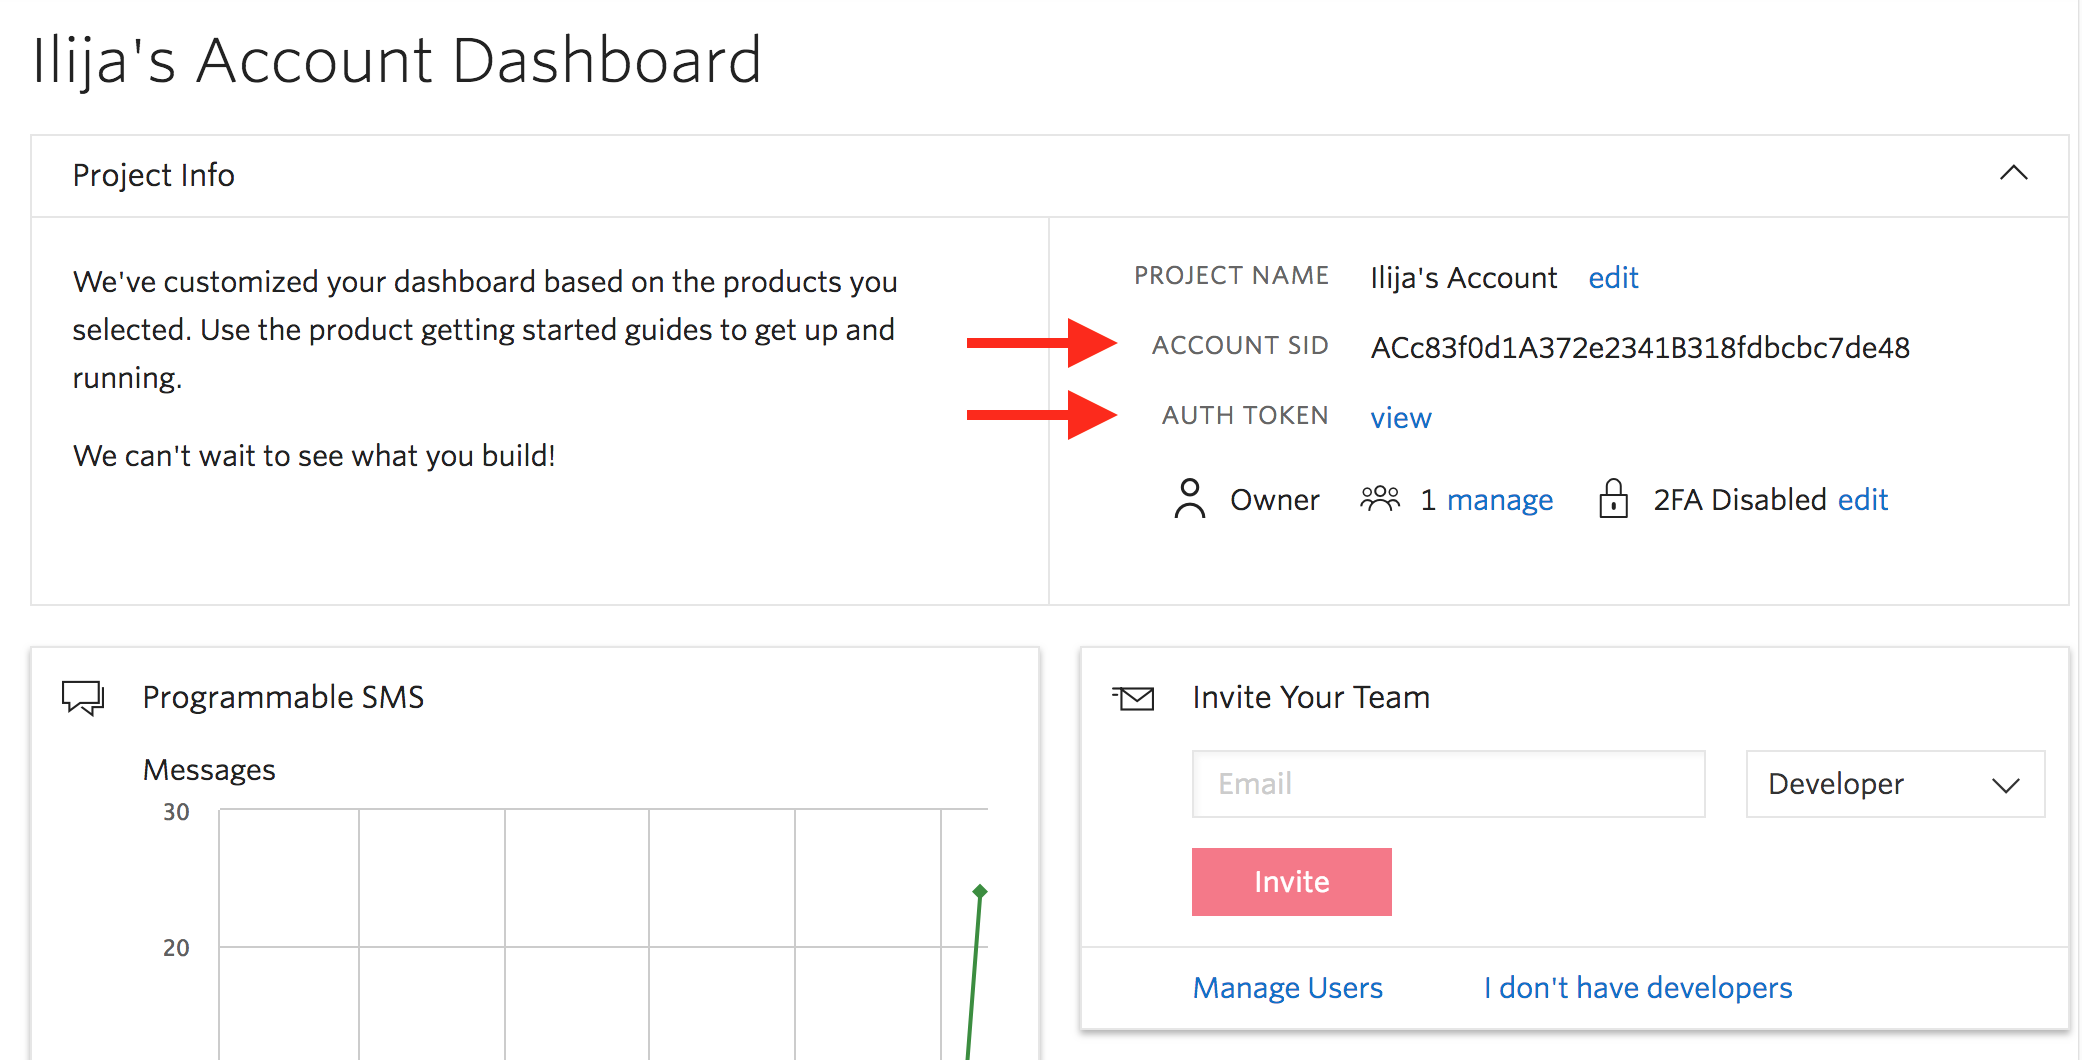 You should obviously click on ‘View’ to see the Auth Token
Save those two and the verified phone number, because we’ll need to add them to our Golang program. The endpoint that our Golang program will call to send an SMS via Twilio is:
https://api.twilio.com/2010-04-01/Accounts/ACXXXXXXXXXXXXXXXXXXXXXXXXXXXXXXXX/Messages.jsonYou can see its docs here. The request body will take three parameters:
From- the phone number that we send the SMS fromTo- the recipient number of the SMSBody- the content of the SMS
Additionally, the endpoint uses basic authentication. This means that we will need to provide the Account SID and the Auth Token as a user and pass to it.
Let’s start sketching out the program. First, let’s create the URL encoded form that we will send to the API:
smsResponse := SendSMSResponse{}
msgData := url.Values{}
msgData.Set("To", to)
msgData.Set("From", from)
msgData.Set("Body", body)
msgDataReader := *strings.NewReader(msgData.Encode())
This uses the url package, which allows us to create a url.Values struct that
will contain the data we want to send to the endpoint.
client := http.Client{
        Timeout: time.Duration(5 * time.Second),
}
We create an http.Client struct, from the net/http package, which we will
use to issue HTTP calls. We also configure it slightly, so it’s default timeout
is set to 5 seconds.
var endpointURL = "https://api.twilio.com/2010-04-01/Accounts/%s/Messages.json"We’ll define the endpoint as a variable - we’ll also put a %s at the place of
where the Account SID should be placed so we can use fmt.Sprintf to replace
it when we issue the HTTP request.
req, newReqErr := http.NewRequest(
        "POST",
        fmt.Sprintf(endpointURL, accountSid),
        &msgDataReader,
)
if newReqErr != nil {
        return smsResponse, newReqErr
}
We create a new net/http Request, using the http.NewRequest constructor
function. It takes three arguments:
- The HTTP verb (
GET,POST,PUT,PATCHorDELETE) - The URL to be called
- The body of the request
req.Header.Add("Content-Type", "application/x-www-form-urlencoded")We will specify the Content-Type header to x-www-form-urlencoded, so
Twilio’s API understands what kind of content we are sending to it. In this
case, we will be sending a URL encoded form.
req.SetBasicAuth(accountSid, authToken)Before we send the request, we will also have to set the basic authentication using the Account SID and the Auth Token.
resp, requestErr := client.Do(req)Now that we have all of the things in place, we can issue the request - by
using the client.Do function. This function will take the request and
execute it, while returning a response. In case something goes bad, it will
return an error as well.
If we look at the documentation of the
endpoint
that we’re calling, we can see an example of the response. In Golang, to
convert the response JSON to a meaningful struct, we have to create a
struct that our program can decode from a JSON. There’s a very nice tool for
this purpose - called “JSON-to-Go”. By
pasting the example on the left hand side, this website will automatically
generate a struct that we can use in our program.
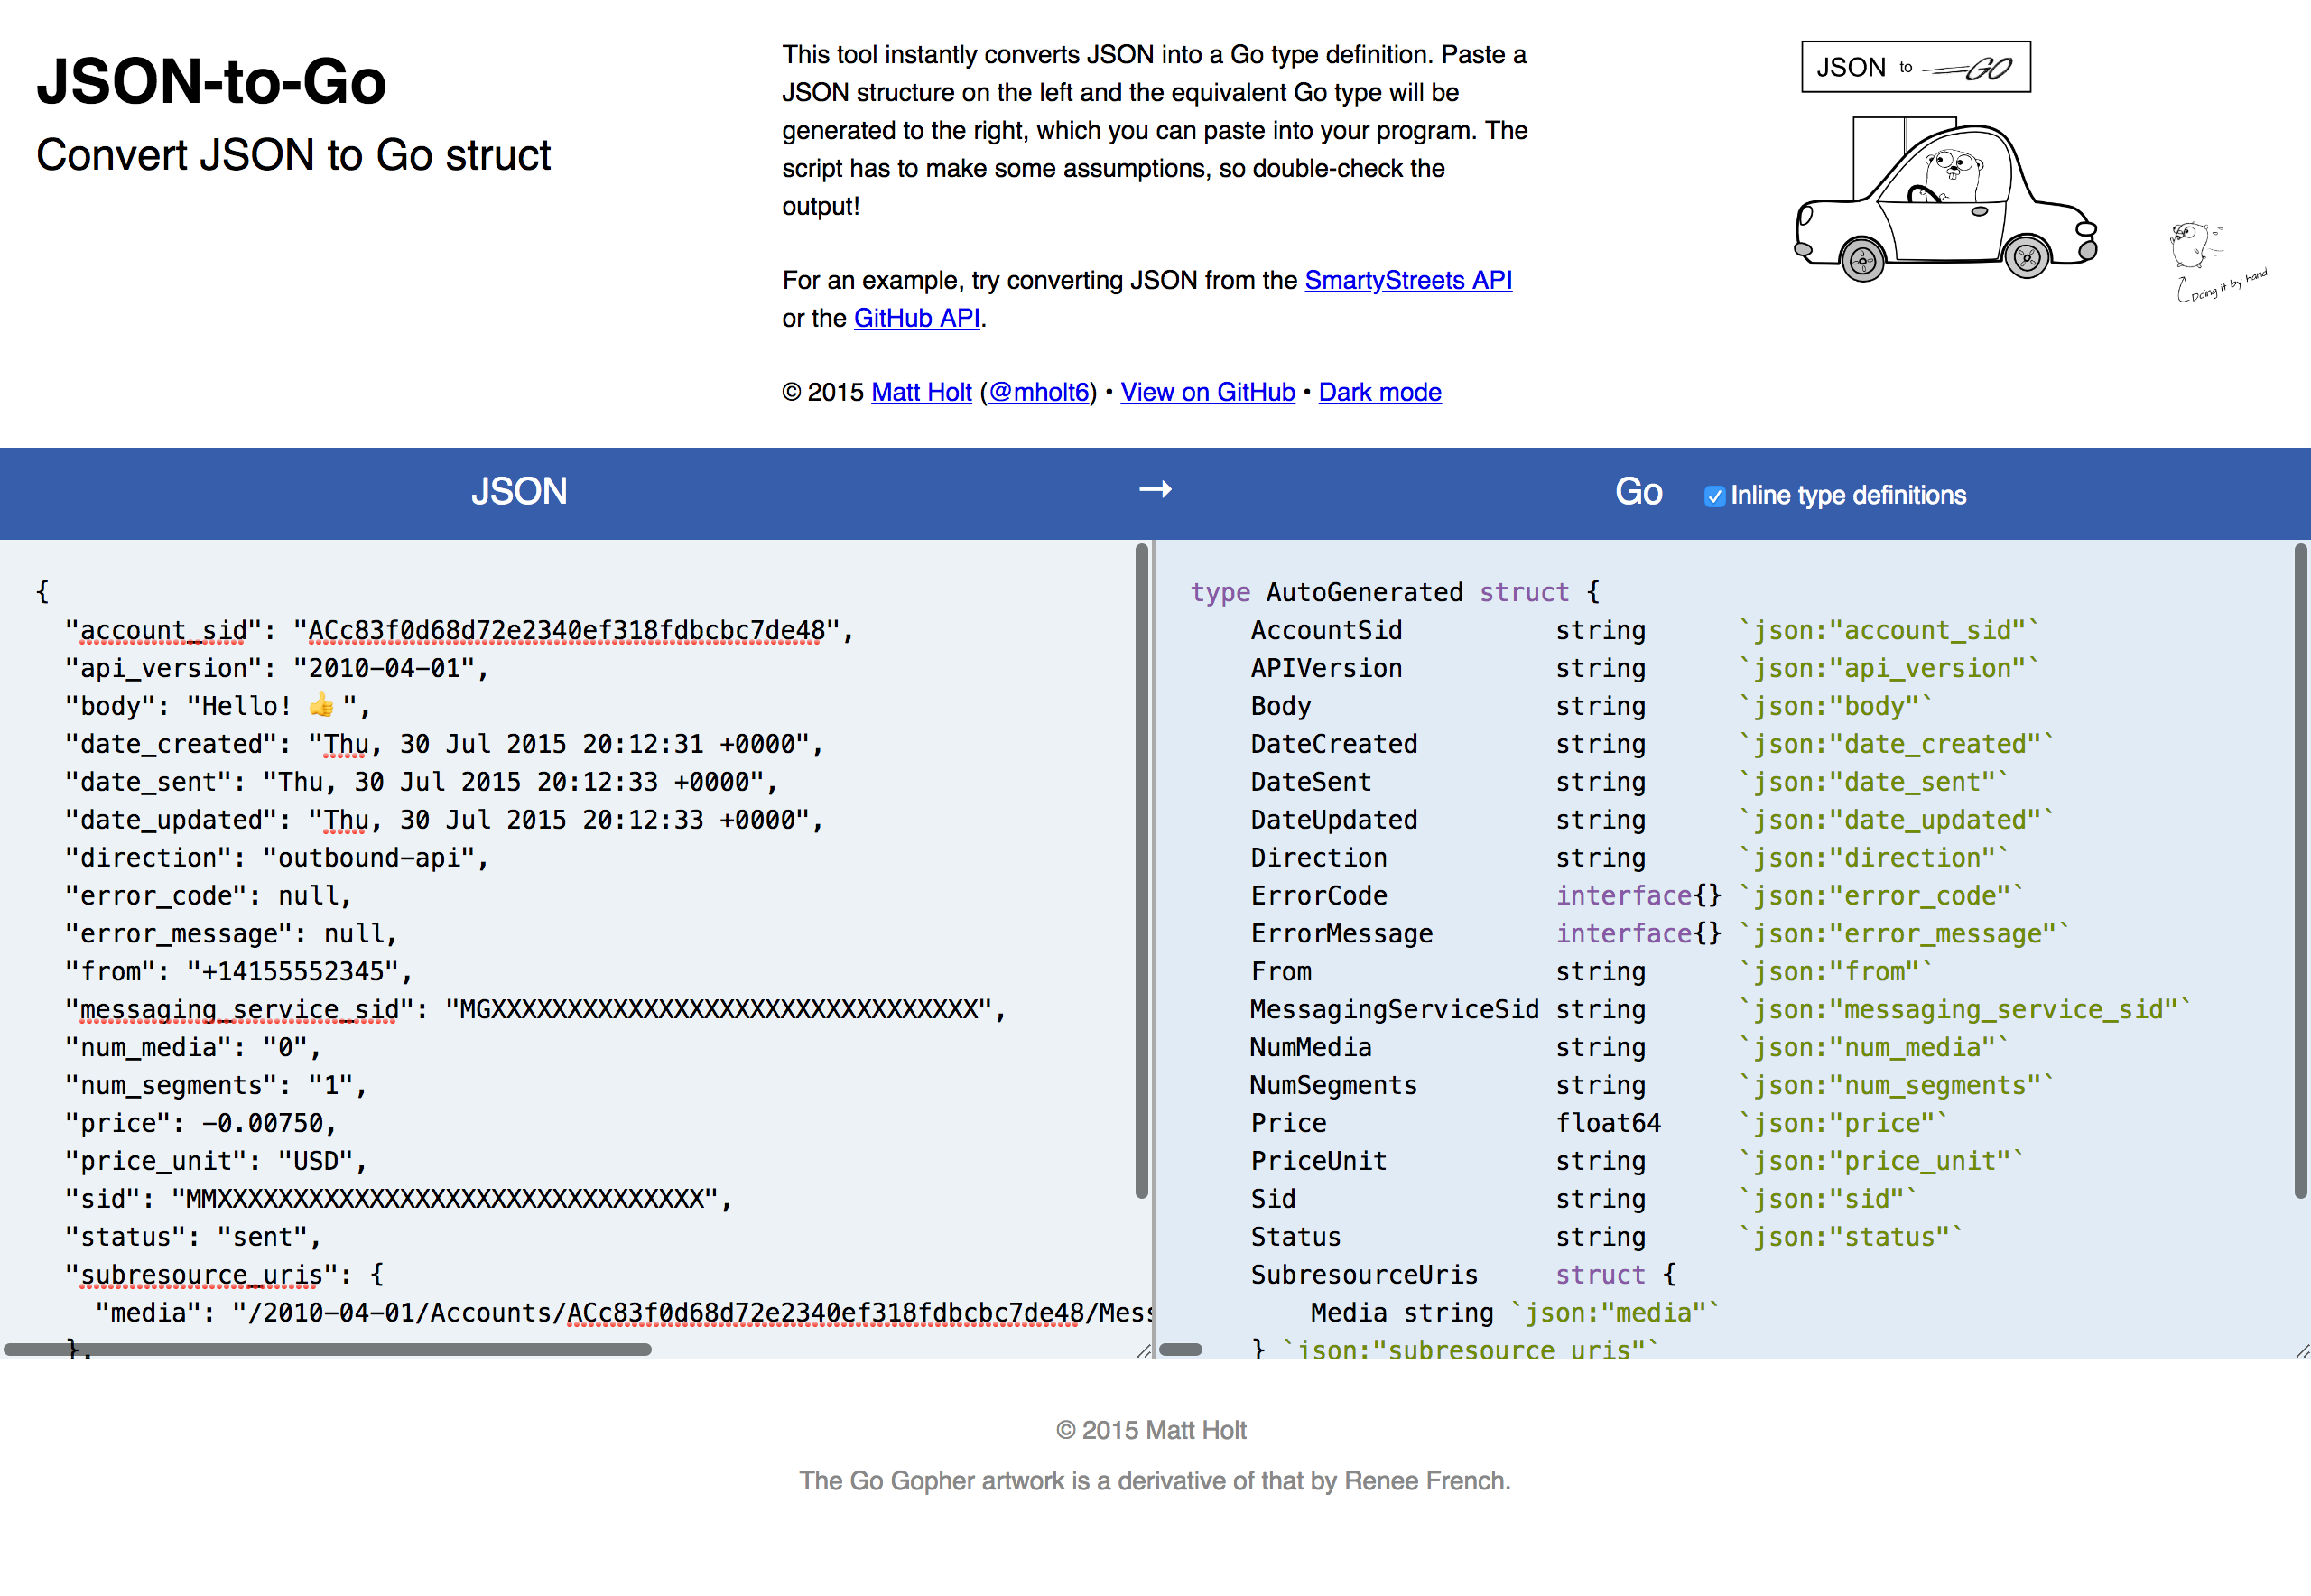 You can copy the autogenerated struct to your program and rename it to SendSMSResponse
This is what the actual struct will look like:
type SendSMSResponse struct {
	Sid                 string      `json:"sid"`
	DateCreated         string      `json:"date_created"`
	DateUpdated         string      `json:"date_updated"`
	DateSent            interface{} `json:"date_sent"`
	AccountSid          string      `json:"account_sid"`
	To                  string      `json:"to"`
	From                string      `json:"from"`
	MessagingServiceSid interface{} `json:"messaging_service_sid"`
	Body                string      `json:"body"`
	Status              string      `json:"status"`
	NumSegments         string      `json:"num_segments"`
	NumMedia            string      `json:"num_media"`
	Direction           string      `json:"direction"`
	APIVersion          string      `json:"api_version"`
	Price               interface{} `json:"price"`
	PriceUnit           string      `json:"price_unit"`
	ErrorCode           interface{} `json:"error_code"`
	ErrorMessage        interface{} `json:"error_message"`
	URI                 string      `json:"uri"`
	SubresourceUris     struct {
		Media string `json:"media"`
	} `json:"subresource_uris"`
}
Having this in place, will allow us to take the body of the response from the
call to Twilio, decode it to a SendSMSResponse struct using the encode/json
package:
smsResponse := SendSMSResponse{}
unmarshalErr := json.NewDecoder(resp.Body).Decode(&smsResponse)
That’s about it when it comes to calling Twilio’s API. We made a function that
builds the payload send to the API, executes the call and parses the JSON in
the response to a struct that we can use in our Go program.

Defining the function to call #
Before we deploy our function to Google Cloud Platform, we need to finish up defining it and hooking it up to the code that calls the Twilio API.
The name of our function will be SendSMS. Since the function will be invoked
via HTTP call, it will have to take a request and response as arguments. For
now, it will return a simple JSON as a response.
package app

import (
	"encoding/json"
	"fmt"
	"net/http"
)

type Response struct {
	Body string `json:"body"`
}

func SendSMS(w http.ResponseWriter, r *http.Request) {
	twilioResponse, err := sendRequest(
		"PUT YOUR NUMBER HERE",
		"Hey Alex, I am running late today, can we please postpone the standup a bit? Thanks! Ilija",
	)
	if err != nil {
		json.NewEncoder(w).Encode(Response{
			Body: "Something bad happened, please try again.",
		})
		return
	}
	json.NewEncoder(w).Encode(Response{
		Body: fmt.Sprintf("Message %s", twilioResponse.Status),
	})
}
To make this work, we are also missing the Twilio API part. Before we go into that, let’s see what this function does:
- Uses the
sendRequestfunction from our Twilio API integration. This function takes the body of the SMS and the receiver’s number as arguments. - The
sendRequestfunction might return an error. If it does, we return an error message in the response JSON. - If the function returns no errors, we will send a JSON representing a successful scheduling of an SMS on Twilio’s side.
Let’s see the full integration with Twilio’s API:
package app

import (
	"encoding/json"
	"fmt"
	"net/http"
	"net/url"
	"os"
	"strings"
	"time"
)

type SendSMSResponse struct {
	Sid                 string      `json:"sid"`
	DateCreated         string      `json:"date_created"`
	DateUpdated         string      `json:"date_updated"`
	DateSent            interface{} `json:"date_sent"`
	AccountSid          string      `json:"account_sid"`
	To                  string      `json:"to"`
	From                string      `json:"from"`
	MessagingServiceSid interface{} `json:"messaging_service_sid"`
	Body                string      `json:"body"`
	Status              string      `json:"status"`
	NumSegments         string      `json:"num_segments"`
	NumMedia            string      `json:"num_media"`
	Direction           string      `json:"direction"`
	APIVersion          string      `json:"api_version"`
	Price               interface{} `json:"price"`
	PriceUnit           string      `json:"price_unit"`
	ErrorCode           interface{} `json:"error_code"`
	ErrorMessage        interface{} `json:"error_message"`
	URI                 string      `json:"uri"`
	SubresourceUris     struct {
		Media string `json:"media"`
	} `json:"subresource_uris"`
}

var (
	endpointURL = "https://api.twilio.com/2010-04-01/Accounts/%s/Messages.json"
	accountSid  = os.Getenv("TWILIO_ACCOUNT_SID")
	authToken   = os.Getenv("TWILIO_AUTH_TOKEN")
	from        = os.Getenv("TWILIO_FROM_PHONE")
)

func sendRequest(to string, body string) (SendSMSResponse, error) {
	msgData := url.Values{}
	msgData.Set("To", to)
	msgData.Set("From", from)
	msgData.Set("Body", body)
	msgDataReader := *strings.NewReader(msgData.Encode())

	client := http.Client{
		Timeout: time.Duration(5 * time.Second),
	}
	req, newReqErr := http.NewRequest(
		"POST",
		fmt.Sprintf(endpointURL, accountSid),
		&msgDataReader,
	)
	if newReqErr != nil {
		return smsResponse, newReqErr
	}
	req.Header.Add("Content-Type", "application/x-www-form-urlencoded")
	req.SetBasicAuth(accountSid, authToken)

	resp, requestErr := client.Do(req)
	defer req.Body.Close()
	if requestErr != nil {
		return smsResponse, requestErr
	}

	smsResponse := SendSMSResponse{}
	decodeErr := json.NewDecoder(resp.Body).Decode(&smsResponse)
	if decodeErr != nil {
		return smsResponse, decodeErr
	}

	return smsResponse, nil
}
The differences from the code in this snippet and the code from the previous section are:
- We define the Account SID, the Auth Token and the source phone number by
taking them from the environment variables. In Golang, one can do this using
os.Getenv('NAME_OF_VARIABLE'). - We take care of any errors that might occur before and during sending the HTTP request to Twilio
Take note that both of the files are part of the same package - app. This is
mandatory, so the function SendSMS can invoke the sendRequest function.
Now that we have both the Twilio API integration and the SendSMS functions,
let’s see how we can deploy them to GCP.

Running our code on Google Cloud Platform #
Before we go on to deploy the function, there are some basics about Cloud Functions that are good to know. If you have used Cloud Function or AWS Lambda, you might know most of the things I am about to explain. If this is the case, you can skip this and go to the section on deploying the function.
If you look at the main page of the documentation for the Cloud Functions, this is the explanation you’ll find:
Google Cloud Functions is a lightweight compute solution for developers to create single-purpose, stand-alone functions that respond to Cloud events without the need to manage a server or runtime environment.
Let’s break this apart, so we get a better understanding of what Google Cloud Functions are.
Functions are lightweight and single purpose. As you already saw in the code above, a Google Cloud Function is really just a function. Being this simple, they do not need any complex setup or configurations.
Functions are stand-alone and respond to Cloud events. When Google Cloud receives a certain event (or a trigger), it will invoke the function.
Google Cloud Platform supports two types of functions:
- HTTP functions - functions invoked when an HTTP trigger is received
- Background functions - functions invoked when an event is received. The type of events and their source can vary.
The last part of the definition of GC Functions is the lack of need to manage a server or runtime environment. In other words, this explains that functions are serverless. This is a side-effect of the nature of Cloud Functions. The runtime is made opaque by the vendor (Google). The only thing we need to configure is the name of the function. Google Cloud Platform takes care of the rest.
Now, serverless doesn’t literally mean an absence of servers. In fact, there are servers that create the cloud. And since Cloud Functions run in the cloud, they run on Google’s servers. In this context, serverless means that we, as developers, don’t need to care about the infrastructure where our code is being run on.
We will not delve any more into serverless or Google Cloud Functions basics. If you want to read more, I recommend the documentation - it’s concise and helpful.
Deploying the Google Cloud Function #
Assuming that you have your gcloud CLI tool installed, to deploy the function
it’s just one simple command:
gcloud functions deploy SendSMS \
  --runtime go111 \
  --trigger-http \
  --region=europe-west1
Before we continue, let’s understand the deploy command that we’ll run. After
the deploy keyword, we supply the function name (in our example it’s
SendSMS). After that, with the --runtime flag we tell GCP that our function
will run in Go 1.11 (that’s the go111 part). Then, we tell GCP that we want
our function to be an HTTP function – meaning it will get triggered via a HTTP
request. Lastly, in our example I set the --region, which is the Cloud region
where our function will be deployed to. Because my physical location is in
western Europe, I prefer the europe-west1 region.
Once we run it, the output will be something like this:
› gcloud functions deploy SendSMS --runtime go111 --trigger-http --region=europe-west1
Deploying function (may take a while - up to 2 minutes)...done.
availableMemoryMb: 256
entryPoint: SendSMS
httpsTrigger:
  url: https://europe-west1-hip-courier-234516.cloudfunctions.net/SendSMS
labels:
  deployment-tool: cli-gcloud
name: projects/hip-courier-234516/locations/europe-west1/functions/SendSMS
runtime: go111
serviceAccountEmail: [email protected]
sourceUploadUrl: https://storage.googleapis.com/gcf-upload-europe-west1-...
status: ACTIVE
timeout: 60s
updateTime: '2019-03-17T22:54:03Z'
versionId: '2'
Now, the output is quite detailed here. We can see the various settings the function has, from the available memory, the HTTPS trigger URL, the name of the function and so on.
But, what’s most important for us is to try and trigger the function. There are
two ways to do this: via a cURL request to the httpsTrigger endpoint, or by
using a gcloud command. The gcloud command to trigger the function is:
gcloud functions call NAME OPTSLet’s run it:
› gcloud functions call SendSMS --region=europe-west1
executionId: uqkmybjc9xab
result: |
{"body": "Something bad hapenned, please try again."}--region flag every time you run any command for your
Cloud Function can be annoying. You can set your default region using: gcloud config set compute/region europe-west1
Wait, what? Well, it seems like something went wrong. In fact, the function worked fine. But it seems that something went wrong when sending the SMS via Twilio.
If we go back to the Twilio integration, we will notice the following lines:
accountSid  = os.Getenv("TWILIO_ACCOUNT_SID")
authToken   = os.Getenv("TWILIO_AUTH_TOKEN")
from        = os.Getenv("TWILIO_FROM_PHONE")
These lines expect that the following values will be present as environment variables. This means that we need to set the environment variables for our function, so it can authenticate with Twilio and send SMS.
Again we can do this via the web UI or via the command line. Let’s use the
gcloud CLI tool again:
gcloud functions deploy SendSMS \
--set-env-vars \
TWILIO_ACCOUNT_SID=ACc83f0d68d72e2340ef318fdbcbc7de48,\
TWILIO_AUTH_TOKEN=e405742cdf254da46eff98c61065bb5e,\
TWILIO_FROM_PHONE=+3197014200568 \
--trigger-http \
--region=europe-west1
What’s cool about serverless functions is that they’re immutable. This means
that every change, regardless if it’s configuration, or an actual code change,
requires a deploy. As you can notice in the command above, with the flag
--set--env-vars we can set multiple environment variables separated by a
comma. Of course, we have to supply the trigger flag (--trigger-http) and
(optionally) the region flag (--region).
The output of the deploy will look like:
Deploying function (may take a while - up to 2 minutes)...done.
availableMemoryMb: 256
entryPoint: SendSMS
environmentVariables:
  TWILIO_ACCOUNT_SID: ACc83f0d68d72e183bbdf318fdbcbc7de48
  TWILIO_AUTH_TOKEN: e405742cdf254duy23n98c61065bb5e
  TWILIO_FROM_PHONE: '+3197014200568'
httpsTrigger:
  url: https://europe-west1-hip-courier-234516.cloudfunctions.net/SendSMS
labels:
  deployment-tool: cli-gcloud
name: projects/hip-courier-234516/locations/europe-west1/functions/SendSMS
runtime: go111
serviceAccountEmail: [email protected]
sourceUploadUrl: https://storage.googleapis.com/gcf-upload-europe-west1-b6b2622d-98cf-4a73-a9e3-13427706c715/2c6ce340-bd1f-48ea-b696-23a59ce579eb.zip?GoogleAccessId=[email protected]&Expires=1552926106&Signature=HvRVFFVpEyWoknznuHYUIbiFD53gx4sihWJWtK8Wxuua9E4BJhjdjIUUa7RBWH0UNWlQX%2FpsUm6ub9S%2FjCQYw70JxMW4fTa4fLMJ%2FdcQQGpRRHYlEPLwPjU8aH68NUjYM1zXoWev%2Fl3jAlOTTt2P0lH3ugYwx%2FtHBop4Dbjl8K87bZmf9JUnyjk2FVGlVi7ino8S3ieRJ1tXGf0qXQAQo0DS%2B99Zuy4IsY2S3RS%2BxxKWcRBLKvibWZfZZYAW5g%2Fv%2B47RV9QE4QWRMdZOM0hK2f3URCxqetPi4rB8S5%2B%2FVZVwdyKqUJ45rNaIhTOcJ3j2t%2Fy8A%2BQ45GcNKiM5BPbz5g%3D%3D
status: ACTIVE
timeout: 60s
updateTime: '2019-03-18T15:52:21Z'
versionId: '4'
If we trigger the cloud function now, we should see it working:
› gcloud functions call SendSMS --region=europe-west1
executionId: jglb9o1mb5w9
result: |
  {"body": "Message queued"}
As the message from Twilio states, the SMS was queued and will be sent to your phone soon. I got my SMS in less than 10 seconds, but YMMV. This is what it looked like:
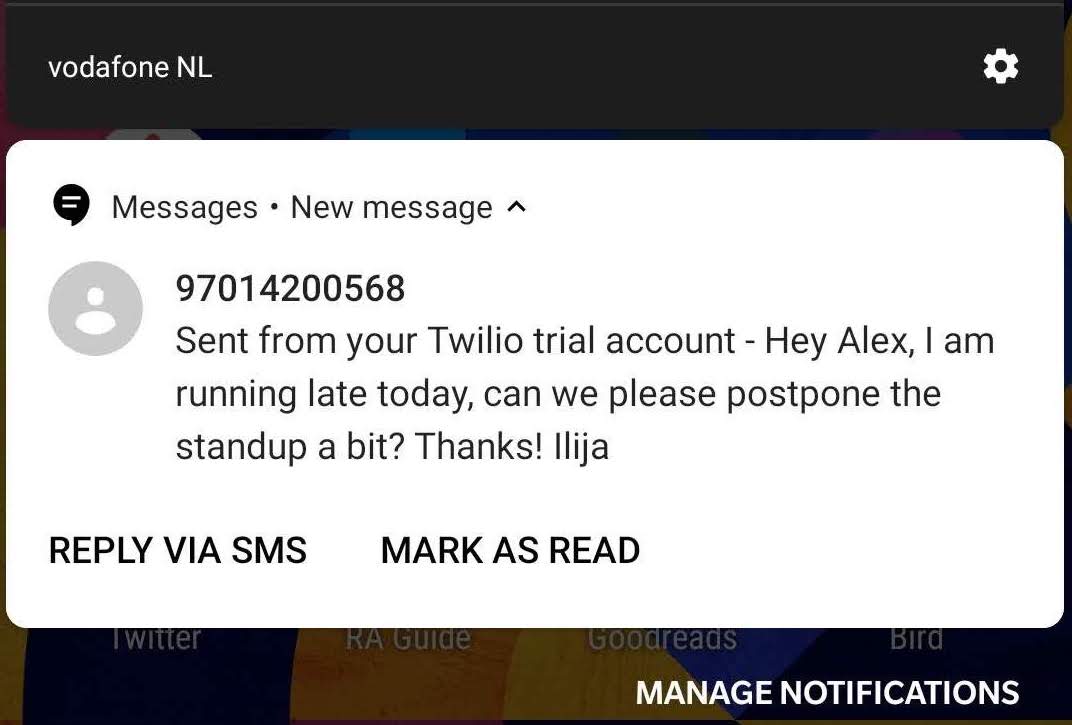 My team lead’s name is Alex - great guy!
This is awesome. It means that our Google Cloud Function is deployed and the Twilio integration is working as expected.
Next, let’s see how we can plug this into Google Assistant, so it can be used by Google Home.
Google Home Integration #
Now that we have the Cloud Function operational, let’s open Google Dialog Flow and create our first agent:
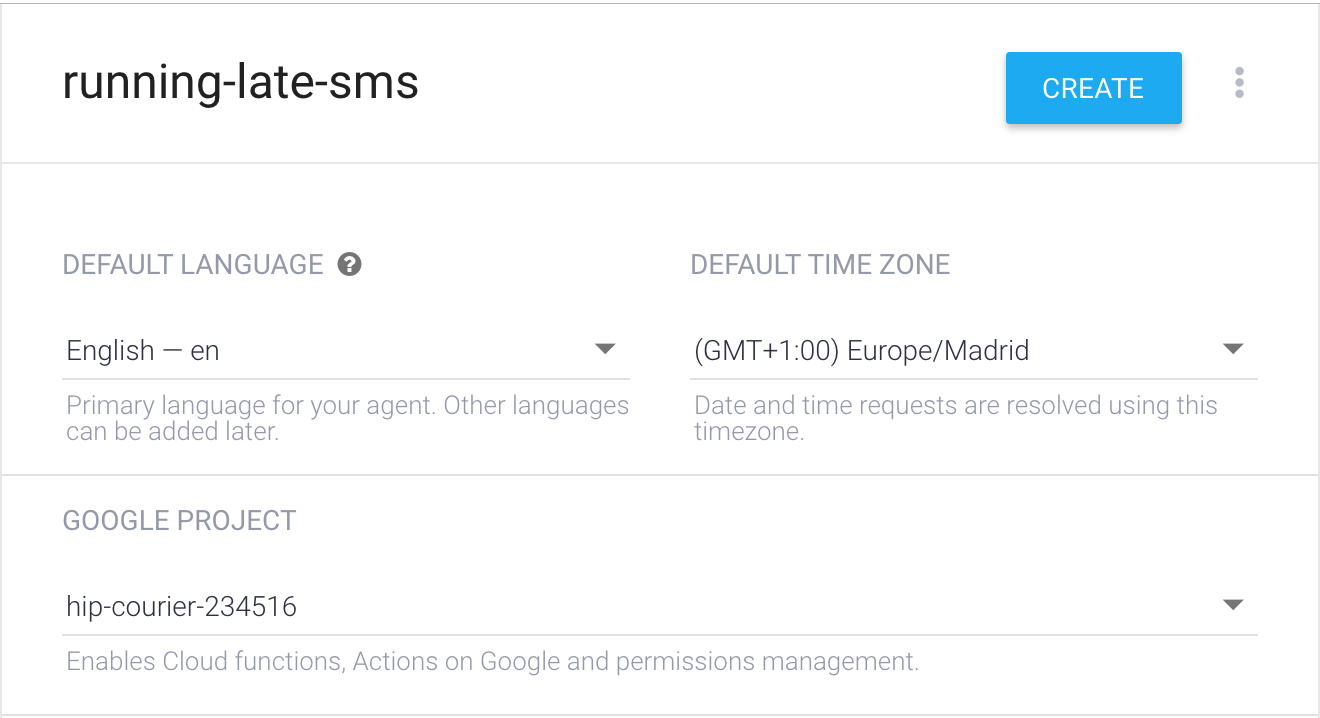 For the project, use the same one that we created in GCP
In my case, I named the agent running-late-sms, but you can choose your own
name here - it doesn’t matter.
The new agent will have two intents: “Default Fallback Intent” and “Default Welcome Intent”. Before we continue modifying these intents, let’s get the Dialog Flow basics out of the way.
Very simply put, an intent is the mapping between the user’s command and the agent executing the command. For example, when a user asks “Hey Google, what’s the weather like outside?”, the intent will understand that the user is asking for the weather. Then, the agent can request the data from an API to get the forecast and report it back to the user.
Intents have four main components:
- A name
- Training phrases - examples of what a user can say to match a particular intent
- Action and parameters - defining how data can be extracted from the user’s statements/input
- Response - the response statement to the user
These are the very basics on Dialog Flow Intents. You can read more about them in the documentation.
Defining our first intent #
Let’s open the “Default Welcome intent” and change it a bit. First, we can rename it to “Start”. This is because our dialog will have only a single command: “Hey Google, I am running late for standup!“. Once that happens, the agent should match the intent with our statement. Then, a Google Action will invoke the Cloud Function over HTTP.
Next, we can remove all the training phrases and add a couple of variants that mean “I am late for standup/work”. For example:
- “I will miss the standup today”
- “I will be late for standup”
- “Running late for standup”
- “I will be late for work”
- “Running late for work”
Google Dialog Flow will apply machine learning on these inputs. This means that your intent will match also statements that are not exactly the same as the training phrases, but statements that have the same intent.
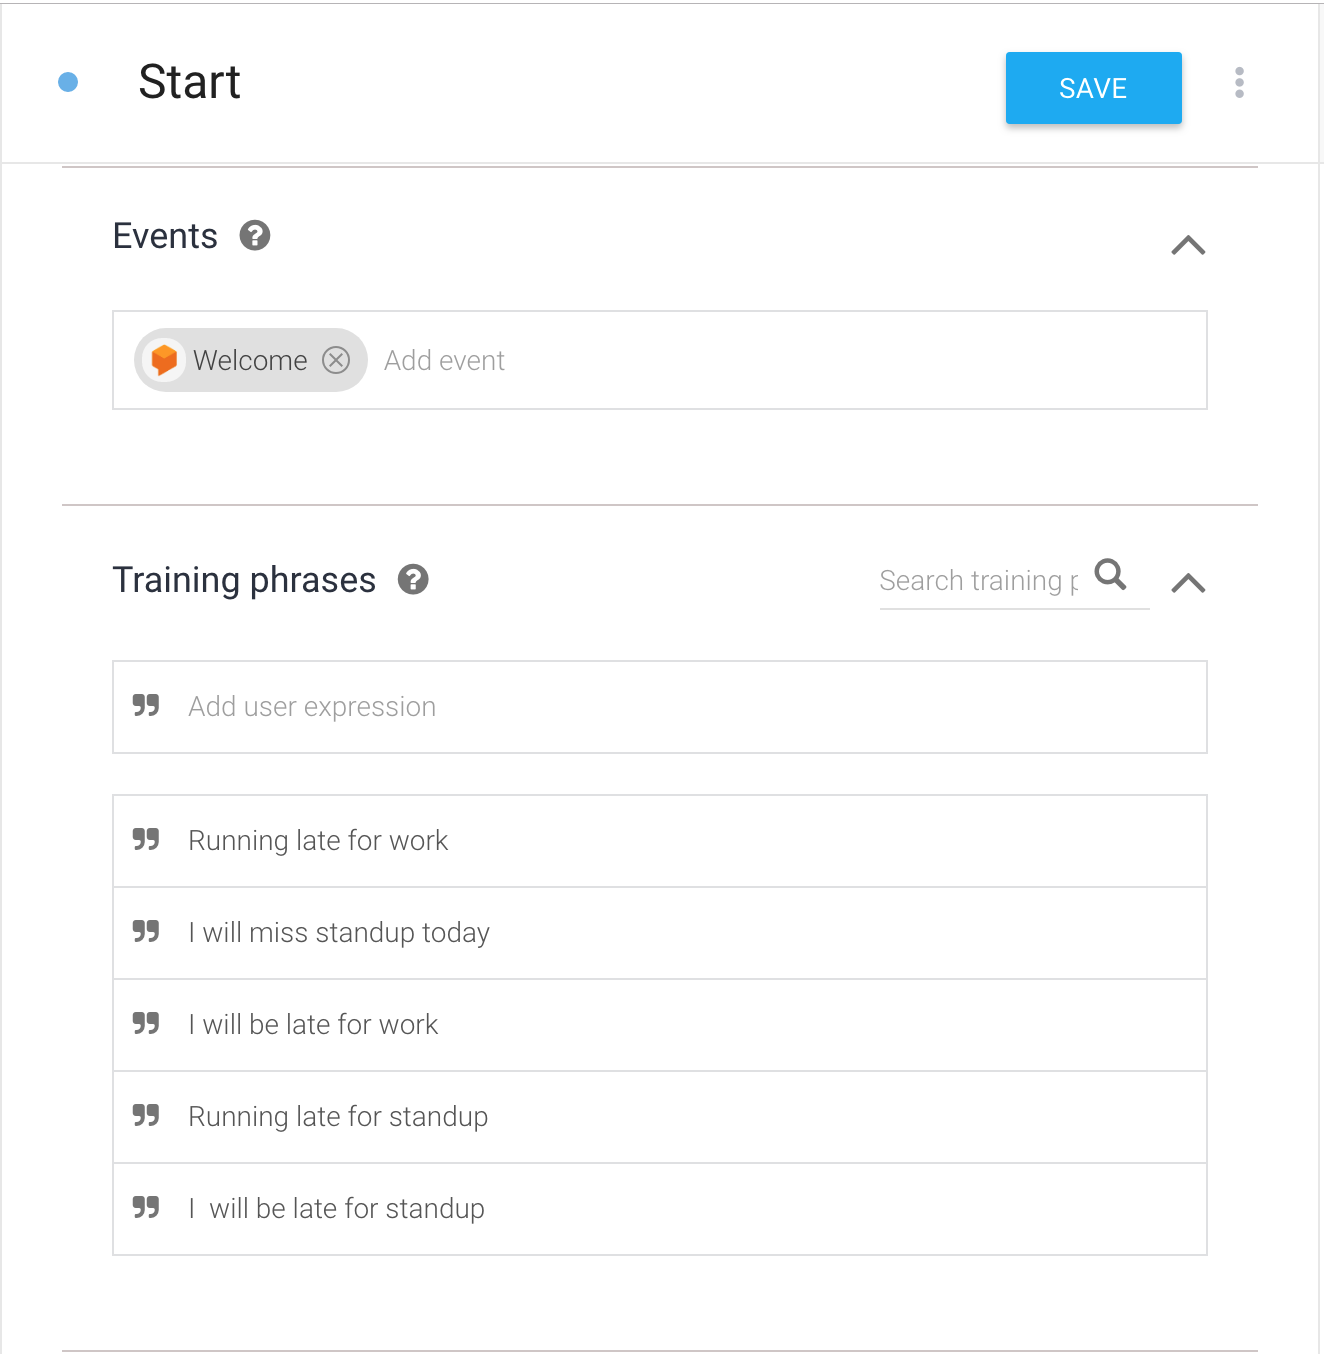
Next, we scroll to the bottom of the “Fulfillment” section where we need to enable the “Enable webhook call for this intent” option. After that, we can save the intent. The next step we need to take is in the “Fulfillment” section in sidebar.
In the “Fulfillment” page we will enable the webhook by checking the checkbox. In the form, we need to add the information for our webhook. Now, to get the URL of our Google Cloud Function, we can run:
gcloud functions describe SendSMSThis will return the metadata for our function, where we can find the
httpsTrigger section with a url:
httpsTrigger:
  url: https://europe-west1-hip-courier-234516.cloudfunctions.net/SendSMS
The httpsTrigger URL is the HTTP trigger where our function will be executed.
All we need to do here is copy this URL and paste it as the webhook URL in
Dialog Flow:
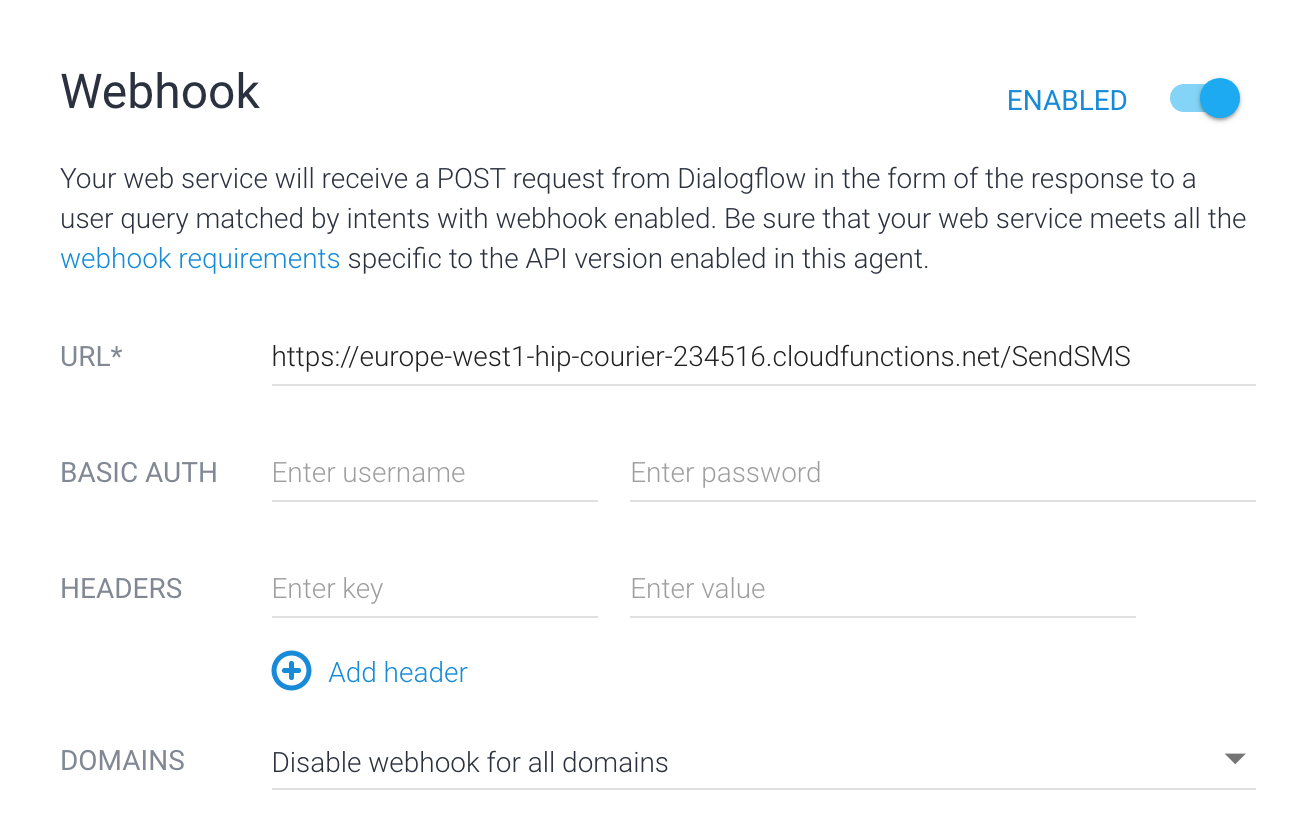 Obviously adding some authentication wouldn’t be a bad idea here
That’s all. Once we save this when our agent matches the intent, the webhook will be triggered and the Cloud Function will be executed. This will end with a call to Twilio’s API which will send an SMS to our phone number.

Speaking Google Assistant’s lingo #
Although Dialog Flow’s options are quite diverse, setting up a simple intent was straightforward. The intents are backed by Google Actions, which will receive the response from the webhook (our Cloud Function). This means that before we go on to use the intent, we have to make sure our Cloud Function returns a response which Google Actions can understand.
Now, if we look at the dialog webhook documentation, we will see that there are some rules on the format of the response.
For example, the Content-Type in the header of HTTP posts from the Cloud
Function have to be application/json. Also, there are other limitations when
it comes to the formatting of the JSON.
For our purpose, we can return the most simple JSON that Google Assistant can understand:
{
  "payload": {
    "google": {
      "expectUserResponse": true,
      "richResponse": {
        "items": [
          {
            "simpleResponse": {
              "textToSpeech": "RESPONSE_FROM_TWILIO_HERE"
            }
          }
        ]
      }
    }
  }
}
While the responses can get very complicated, for our simple use case the response above is all we need. Again, we can use the nice JSON-to-Go tool and convert the JSON to Go structs:
type DialogFlowResponse struct {
	Payload Payload `json:"payload"`
}
type SimpleResponse struct {
	TextToSpeech string `json:"textToSpeech"`
}
type Items struct {
	SimpleResponse SimpleResponse `json:"simpleResponse"`
}
type RichResponse struct {
	Items []Items `json:"items"`
}
type Google struct {
	ExpectUserResponse string       `json:"expectUserResponse"`
	RichResponse       RichResponse `json:"richResponse"`
}
type Payload struct {
	Google Google `json:"google"`
}
To make our life easier, we will also create a simple constructor function. It will take a string (the response from Twilio) as an argument:
func NewDialogFlowResponse(message string) DialogFlowResponse {
	return DialogFlowResponse{
		Payload: Payload{
			Google: Google{
				ExpectUserResponse: "false",
				RichResponse: RichResponse{
					Items: []Items{
						Items{
							SimpleResponse: SimpleResponse{
								TextToSpeech: message,
							},
						},
					},
				},
			},
		},
	}
}
The constructor will build the nested structs that, when serialized, will result in the JSON that Google Assistant is expecting.
Now that we have the constructor and the necessary types, we can plug them in
the SendSMS function:
func SendSMS(w http.ResponseWriter, r *http.Request) {
	twilioResponse, err := sendRequest(
		"PUT YOUR NUMBER HERE",
		"Hey Alex, I am running late today, can we please postpone the standup a bit? Thanks! Ilija",
	)
	if err != nil {
		errResponse := NewDialogFlowResponse("Something bad hapenned, please try again.")
		json.NewEncoder(w).Encode(errResponse)
		return
	}
	response := NewDialogFlowResponse(fmt.Sprintf("Message %s", twilioResponse.Status))
	json.NewEncoder(w).Encode(response)
}
All we had to do here is instead of building the JSON ourselves, we use the new
DialogFlowResponse struct to take care of this problem. If we deploy the
function to GCP and run it we will see the new output:
› gcloud functions call SendSMS
executionId: 4xo1v0ex57jw
result: |
  {"payload":{"google":{"expectUserResponse":"false","richResponse":{"items":[{"simpleResponse":{"textToSpeech":"Message queued"}}]}}}}
This means that once our Google Action invokes the Google Cloud Function, the response can be understood by Google Assistant. And when I say “understood”, I mean that you will hear your Google Assistant saying out loud “Message queued”.
You don’t believe me? Let’s see that in action!
Testing our agent #
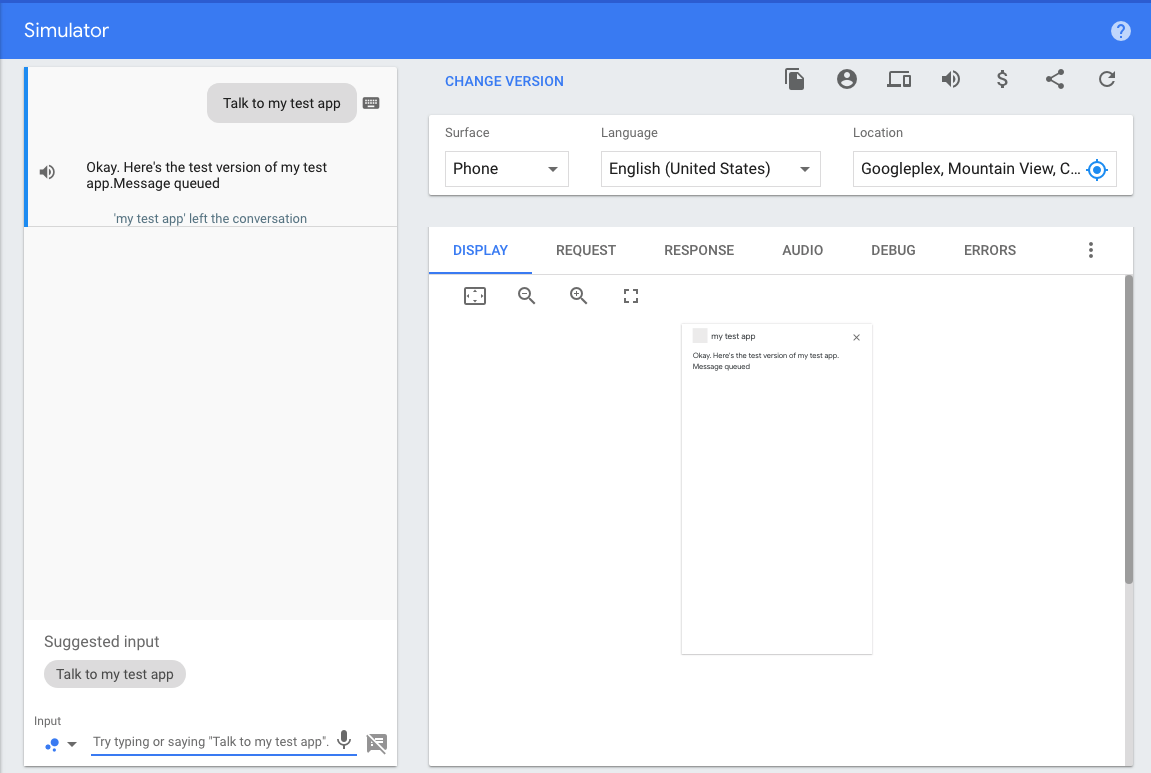
There are two ways to test our new agent - via a Google Home device, or via the simulator.
If you’re in possession of a Google Home device and if you’re logged in with the same account as the one you use on Google Dialogflow or Actions, all you need to do is tell your Google Home “OK Google, talk to my test app!”. This should do the trick.
In this article, we’ll use the simulator. On the right hand side you can click on the “See how it works in Google Assistant” link. This will take you to the Google Actions simulator.
Google Actions is a platform that allows extension of Google Assistant’s capabilities. In our case, this means that the Google Dialog Flow agent will invoke a Google Action, which will be the triggered by the Google Assistant. I know it sounds a bit complicated, but in reality these platforms are well connected so the integration is quite simple.
Once the simulator opens, you can click on the suggested input “Talk to my test app” in the bottom of the screen. That will trigger the Dialog Flow agent which will execute the webhook right away:
 You should obviously click on ‘View’ to see the Auth Token
You can notice that the response from the Google Assistant contains “Message queued”, which is Twilio’s response. After you see the response, an incoming SMS should pop on your phone’s screen.

In closing #
While we have gone through quite the distance in this article, our application is still not shipped to the Play Store for mass-consumption. There are couple of more simple steps that you need to take to release this action to the world.
Now, before you go on to do this, you have to first think about some of the very rough edges of our action. Basically, at the moment the Google Action that we have created will work only for our use case. If you would like to publish this to the Play Store, you need to make adjustments:
- The user has to be able to configure the content of the message sent and the phone number of their team lead, using their Google Home
- We have to have a backend where we would store this configuration and every time someone invokes the Google Action (via their Google Home), we would have to process this using our Cloud Function
- You have to be ready to bear the cost of this. The Twilio API + the Google Cloud Function are not free to use for production, so you will be charged for the usage
I’ll leave this up to you. Nevertheless, we still went through the whole process of creating this action. It took many steps:
- Created a Google Dialogflow intent
- Hooked it up to a Google Action
- We integrated with Twilio’s API using Golang
- We deployed our Golang program as a Google Cloud Function
And we actually tested our whole integration and we received an SMS to our phones.
Before we wrap it up, I am curious: what other kind of such Google Home integrations would your create to automate simple tasks in your life? Let me know in the comments!